Release of 21.3-Inch 5 Megapixel 3D Monochrome LCD Monitor for Digital Mammography by Eizo Nanao

Eizo Nanao Corporation has announced the release of RadiForce GS521-ST, a 21.3-inch 5 megapixel monochrome LCD monitor capable of displaying 3D stereoscopic digital mammography. In developing the RadiForce GS521-ST Eizo has utilized a half-silvered mirror method for achieving high image quality required for displaying digital mammography.

Using the half-silvered mirror method, the image for the right and left eye are displayed separately on the two separate monitors that are mounted vertically and horizontally.

The half-silvered mirror is placed between the two monitors, responsible for sorting the two images and projecting them in the same direction. The user can view the resulting image in 3D with the aid of polarized glasses. The mass production of the RadiForce


Release of World’s First DCI Compliant 4K Digital Cinema Projection System by SONY

DCI specification with its great emphasis on digital movie content security prescribes “Digital Cinema Package” (DCP) as its data file format which includes encryption for digital movie content. The DCP file can be distributed via satellite or they could be delivered physically to theaters on a hard disc drive (HDD), with cryptography key to be delivered separately to theaters, where DCP file can later on decrypted with cryptographic key by cinema server, and screened by the projector. To further expand the security measure on the DCP file, the file is embedded with an electronic watermark or otherwise known as forensic mark in preventing illegal recording of projected content.

In addition to this, security measures such as an anti-tamper function are also incorporated in the projection system as an extra measure in preventing DCP files from being stolen, removing all the possibilities of pirated production.

Based on DCI specification, Sony has unveiled industry’s first DCI compliant digital cinema projection system comprising of a projector capable of projecting an ultra high resolution 4K video (8.85 million pixels, more than four times that of full HD) SRX-R320 as well as cinema server designed to store and transfer video contents to the projector.


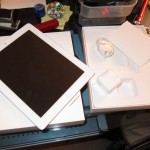
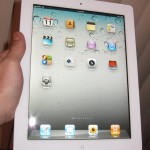
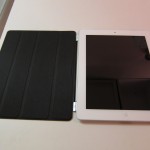
Apple iPad 2: White 16GB Unboxing

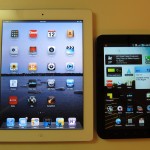
Well, as big of an iPad 2 skeptic as I have been, ultimately I could not resist. Here are some quick shots of my new white iPad 2 16GB Wifi+3G. Here I contrast it with my Galaxy Tab and iPhone 3GS. Keep reading for the all the photo goodness!

I’ve started with some closeup shots of the white iPad 2 (Wifi+3G, AT&T model) and have some comparisons with it with the Galaxy Tab and iPhone 3GS. Enjoy!


TV Remote With Apple PC

If you don’t need to have yet another remote or you’re tired of the couch eating your Apple TV’s remote, you can have your device learn your TV’s remote control and use it instead. This works both both the first and second generations of the ATV.

1. Use your Apple TV remote and turn on the Apple TV device.

2. Select Settings from the menu.

3. Select General.

4. Select Remotes.

5. Select Start.

6. Most TV remotes have options to control multiple devices, set your TV remote for an unused device (like VCR).

6. Put down the Apple TV Remote and use the TV remote.

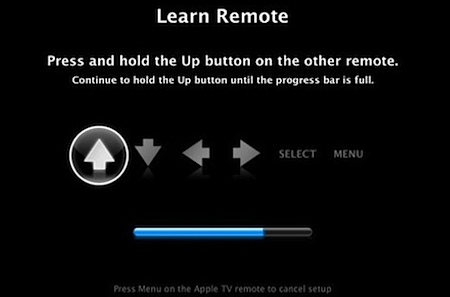
7. A screen will appear with up, down, left, and right arrows as well as SELECT and MENU. These are the keys that need to be programmed on the TV remote.

8. As each button is highlighted on the screen, press and hold the corresponding button on the TV remote for the Apple TV to learn.

9. Use the Apple TV remote to input a name and then select the Submit button.

Your TV remote can now be used to control your Apple TV. Put your Apple TV remote away.


How to : pick the perfect point-and-shoot camera

If you're in the market for a new point-and-shoot camera—whether for yourself or for someone on your holiday shopping list—the array of choices can make it difficult to find one that's right. Here are some tips to help you narrow down the options.

First things first—do not get wrapped up in the number of megapixels. Many point-and-shoot cameras have 12 megapixels or more, which exceeds the number of pixels that many professional cameras could capture just five years ago. Increased megapixel counts on the tiny sensors used in most compact cameras just means more noise, not necessarily sharper images.

Instead, there are a few characteristics to focus on: lens focal range and quality, size, ruggedness, and ergonomics. Depending on the person you're shopping for, one or more of these criteria will narrow down the options quite a bit.

Lens

The first thing I look for in a compact camera is a good lens. The lens is what forms an image for the sensor to capture, so even if the camera has 12MP, a crappy lens will just give you 12MP worth of crap.
Most point-and-shoots have a zoom lens that starts at around 35mm equivalent—decent, but might be tricky in tight quarters. Many newer cameras offer a wider angle of view at the short end, usually 28mm equivalent. If you're buying for someone that likes landscapes or architecture, look for something that can go wider—some cameras have a lens as wide as 24mm equivalent.

On the long end, something in the 100-150mm equivalent range is pretty standard. That's good for head-and-shoulder portraits, but it won't get you close enough for things like sports or nature photography. Some cameras offer ranges up to 200mm, but most manufacturers offer something along the lines of a "super-zoom"—cameras with zooms that range up to 400mm equivalent or more. If your shutterbug likes NASCAR or going on safari, then the longer the zoom, the better.

Finally, keep an eye out for lens quality. There aren't many good ways to spot this when shopping, but higher priced cameras tend to have better lenses. These lenses also tend to have larger maximum apertures, which are good for capturing better pictures in low light. Look for "f-stop" ratings better than f/2.8 (the smaller the number the better). Also, the more glass you can see, the greater the likelihood of a higher quality lens.

Size

Size is an important consideration, but it often represents a trade-off. Generally speaking, there's no good reason not to get the smallest camera that has the features you are looking for. However, size will often limit the zoom range that can practically fit inside the body. Women in particular tend to prefer something that can slip inside the smallest purse, for instance, so you may choose size first and zoom range second.

On the other hand, larger cameras can pack more lens inside. Also, they can house a larger sensor, which typically performs better in low light and captures better color in bright light. If you're buying for someone with large hands, they are not going to be happy with a tiny camera, no matter how cool looking or expensive.
As another rule of thumb, the higher number of features that are packed into a smaller package, the more expensive the camera will be. If two models have the same specs and size isn't the most important factor, you can usually save a bit by choosing the slightly larger of the two.

Ruggedness

Digital electronics and ruggedness aren't usually synonymous, but there is a niche for cameras that can survive the elements. For instance, someone who spends a lot of time outdoors will prefer a ruggedized camera like the Pentax Optio W90 or an Olympus Stylus Tough. These special models have seals to make them weather or waterproof, shock protection to handle drops, better components for extended thermal extremes, and casings that are generally impervious to things like sand and dust. Some models can even shoot underwater to depths of 30ft or more.

These models are still relatively rare, so if this kind of protection is a consideration, it will narrow your choices quite a bit. Keep this type of camera in mind for anyone who spends a lot of time near water, sand, extreme cold or heat, or participates in anything that might be called an "extreme sport." If the person you're shopping for is a real klutz, he or she might really appreciate a shockproof camera as well. 

Ergonomics

This is something that often gets overlooked when shopping for a camera, especially since most electronics stores have the cameras under lock and key or tethered to a display with bulky anti-theft devices. When possible, try to shop somewhere where you can handle a floor model and get a feel for how the buttons work and how the menus are accessed. In lieu of that, keep an eye on sites like the excellent DPReview to check out models you are considering.

Unfortunately, there aren't many "simple" digital cameras—the ease of adding features via software and fierce competition among an array of manufacturers has lead to an explosion of complexity. Still, some cameras offer switches or buttons that throw everything into fully automatic mode if tweaking settings gets out of hand. If you're buying for someone less tech-savvy than yourself, such a feature will be appreciated; it'll also make troubleshooting easier on you when you can just say, "hit the green button."

There's no easy choice to make among the dozens of current camera models out there at any given time, but these tips should make it easier to break the choice down to a few models. If you have any particular recommendations to make, tell us what criteria makes that camera great in the comments.


How-to : Update your Nexus One to Android 2.2

Google unveiled Android 2.2, codenamed Froyo, at the Google I/O developer conference last week. The new version brings significant performance enhancements and a number of compelling new features. Google intends to roll out the new version to Nexus One users in over-the-air (OTA) updates over the next few weeks. Users who want to get their hands on the latest version right away, however, can manually update their handsets.

In a concise message published in the XDA Developer forum, well-known Android modder Cyanogen posted a link to Google's official Froyo update package—a compressed zip archive that can be manually installed on unmodified Nexus One devices.

Before you try to manually update, it's important to note that this update method is not officially endorsed by Google. The risk of bricking or similar undesirable outcome is minor, but still exists. Users who don't want to take any risks should wait for the OTA update. It's also important to note that this update method might not work on rooted devices and is not compatible with all Nexus One handsets.

The text "FRF50-from-ERE27" that appears in the zip filename tells you the build number of the updated version and the build number that you need to have on your phone in order to be able to use the update. Build FRF50 is the official Froyo release. ERE27 is an Eclair build that is on most of the Nexus One handsets that are compatible with T-Mobile's network frequencies.

The manual update using this specific zip file will work only if you are running build ERE27. You can see what build is on your phone by selecting the "About Phone" item in the settings menu. The build number will be listed at the bottom of the dialog. The AT&T-compatible N1 handsets are running on a more recent build (EPE54B) than the T-Mobile handsets and consequently cannot use the "FRF50-from-ERE27" zip file to update to Froyo. It's very likely that Google has an alternate update file for EPE54B users, but it just hasn't been found yet.

After you download the zip file, put it in the top level of the filesystem hierarchy on the SD card in your Nexus One and change the filename to update.zip. Turn off your phone and then turn it back on, but hold down the volume down button when you hit the power button. This will take you to a screen with a simple menu and three Android mascot characters on skateboards. Use the volume buttons to navigate to the "RECOVERY" item on the menu, and then hit the power button. The phone will start to reboot again, but it will display a screen with an exclamation point icon instead of booting all the way.

When you see the exclamation point, press and hold the volume up button and the power button at the same time. This will cause the phone to display the system recovery interface. It might get stuck at the exclamation point screen, in which case you just need to reset and try again. It sometimes takes two or three attempts. At the recovery menu, use the volume buttons to navigate to the "apply sdcard:update.zip" item. Hit the Nexus One scrollball to select the menu item and start the update.

When you start the update, you will see a progress bar as the update package is decompressed and analyzed. If you are not running a compatible build, you will see an "assert failed" error, and the update will abort. When it finishes, you can select the "reboot" option from the menu to start the phone up normally. If the update was successful, you will have tasty Froyo on your Nexus One.


HTC EVO 3D Sprint Unleashes

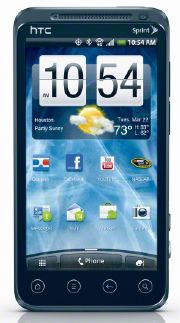
The first 4G phone with a qHD 4.3-inch 3D display. The EVO 3D is powered by a 1.2 GHz dual-core processor and sports dual 5-megapixel rear-facing cameras for 3D photo and video capture. The processors support advanced 3D technology including full 1080p 30 frames per second HD video and stereoscopic 3D video capture and playback. Another sweet detail is that the EVO 3D will ship with the latest version of Android 2.3 aka Gingerbread. It also will come with a 4G hotpsot and you can connect up to 5 Wi-Fi-enabled devices to it.

Personally, I think 3D on a small phone display is a bit of a gimmick. When I played with the LG Optimus 3D, I wasn't too impressed with the glasses-less 3D display. It looked grainy and a bit distorted. Then again, I've also spent some time playing with the Nintendo 3DS and was quite impressed with its 3D games. HTC hardly ever skimps when it comes to design so we'll just have to see how the EVO 3D looks.

Sprint took a page out of Verizon's "Droid" playbook by marketing other phones under the "EVO" name. At CES, we saw the EVO Shift 4G. It is a smart move as the EVO 4G is the fastest selling phone on Sprint and the first 4G phone to hit the market.